Monday, June 20, 2011

BASIC TOOLS 2


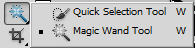
The magic wand tool


probably the tool you will use the most.
what this tools does is it selects all the pixels around it having the same color.
It works kind of like your bucket tool in paint.
but it makes a selection like the marquee tool


in case you want to add to the selection you can chooses the second button on this
menu(located at the top left) if you want to subtract select the third and if you have two
selections and want the thing that's only comman to them you select the last one



the quick selection works the same way but dost select all the pixels around but only in the limited
brush area of your selection


The cropping tool


based on your drag selection the canvas will change suppose i drag around the "J"


i get a box in which i get to alter my selection when I'm done with it just hit "enter" and my canvas
gets cropped.


we then have our slicing tool


what this does is it divides our canvas, not really sure about it because i never use it but thats what im guess it does


you can use the slice select tool to move around you selected slices!!


The eye dropper tool....this tool allows you to select a color that is there in the canvas or any other canvas
take for example i want the same gray that is there as the lines so i can use the eye dropper tool
and select it


example of eye dropper


The color sampler tool allows you to compare different colors based on their RGB
for example


we then have our ruler tool this acts like a normal ruler...if i have specific measurements and want to maintain it just have to use the ruler


we then have our notes it acts like post it notes on photoshop if u want to leave a note you just click and refer to it later
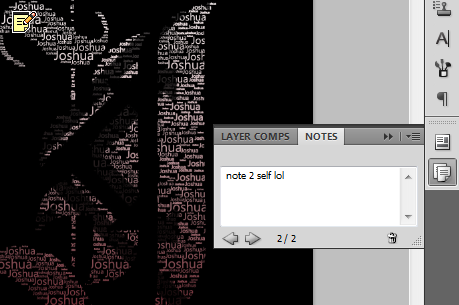


we have our count......you in case you want to keep count of whatever
hehehehe


Monday, June 13, 2011

Secret themes hidden in Windows 7


By default Windows 7 has themes (or desktop backgrounds that changes automatically in a specified period of time) which can be seen when you right click on you desktop and click on personalize.
Apart from this windows also has themes which are hidden and are not known by lot of people. So here it is where you will find the themes.
1. Press windows + r (Run command window).
2. Type this "c:\windows\globalization\mct" without the quotes.
3. This will navigate you to the folder containing the themes.
4. Inside every folder there will be a folder called "Theme".
5. When you open you will see the theme file.
6. Double click on it and there you have a theme activated for your desktop.

Saturday, June 11, 2011

Face Merge Tutorial

This tutorial shows you how to manupulate your face into another person face or merge into another photo.This can be done by using the simple tools present in the toolbar.This is great start for beginners and fun to play around using photoshop.I myself started doing such edits and by this u get the hang of the tools well.

I have used my own picture here for example,you can follow with you own photo.


this is the final result:-


1)the first step for a perfect face edit is to have a photo in which the face facing angle or the angle in which your face should be close to the angle of the face you wanna work on.Find a good photo to get started to achieve desired result,sumthing as shown below:


2)Select your face using the "Quick selection tool" or "magnetic lasso tool".To get the perfect selection,u can adjust the tool by selecting (+ and -) where + is for adding in the selection and - is for substracting from the selection.copy and paste the selection on to the desired image.


3)Now resize and place your face on the face u want to merge.(resize using ctrl+t and press and hold shift to resize) and close the original photo.


4)by using "eraser tool" now erase the unwanted details like the forehead leaving your eyebrows,you can ignore the area lower then you face for now.


5)now adjust the brightness and contrast by going to the top menu "image"==>"adjustments"==>" ,the photo needs to be adjusted till u find it merging withe the forehead of the other picture.Even erase out to make your face fit best. see as shown below:


6)Next you jus have to use "smudge tool" to drag n fill the forehead frm the area between the eyes.After you do that your face should be almost merged into the background.


7)Now to handle the lower below the face,for this simply use the "clone tool" by selecting the Background layer in the layers(on the right) then since here v need 2 fill the area with black so (press n hold alt) and click on the black portion,this will set an area from where it will clone(copy).Now simple use left click to paint the area.repeat the process till you get your result.


8)Since you u filled your forehead as above,now you can chnge ur brightness to your original color and it will look more real as shown below:-


9)finally,use "blur tool" around the outlines og your face to give the finishing look.


*This is not required,i wanted get the same look as the original guy so i used "burn tool" to give myself the eye makeup.


THATS ALL!!! ENJOY!!!

Heres the original and the result:


Wednesday, June 8, 2011

BASIC TOOLS 1


In this tutorial I will be teaching you the basic tools


we first have our move tool

before this i have to explain layers

its like cutting out pictures from a magazine and placing them one over the other
at any point you can move any picture without disturbing the others
we have the same option in photoshop
each layer is different picture which can me adjusted, moved, edited ,etc.

in the layer panel we also have the eye on clicking it the layer turns visible or invisible.


now back to the move tool

it does what it says "MOVE THINGS " lol


we can move around selected layers either in the same file
or onto another file by dragging it to the above tab

on default we are unable to move the background coz it has a lock on it
image

to be able to move it just double click the layer and it will unlock
but makes the main image transparent if there is no background.


We then have our marquee tool 


this allows us to make a selection in a layer and then copy it onto another layer
or cut it from another layer

we can do this by right clicking

by clicking the marquee tool and holding it we can get different shapes for selection.


then we finally have the lasso tool which is basically your free hand marquee tool


by holding down this button we also get more options

we have the magnetic lasso which adjusts according to the border of the image

and we have the polygon lasso which allows you to plot the points of the selection ends


Tuesday, June 7, 2011

THE BASE OF PHOTOSHOP


We start with the basic file->new

we have your basic presets which set up your width height and resloution as per the preset


If you chose custom we get to chose our width and height in pixles cm inches anything you want 


we then have the colour modes... each mode has its own speciality and use
they are :-

Bitmap-its a one bit colour mode works with bits(pixels)
Grayscale-mostly used with black and white prints it consits of colour only between black and white like              gray (hahahaha) hence the name
RGB-it is the red green and blue channel uses light to colour used only when using for digital media like computers, projectors and TVs.
CYMK-used for print media like posters papers etc printers use these colours it stands for Cayan Yellow Magenda and Black.
LAB-(not sure) it the type of color schem used in photo studios.


thats that for the basics of starting out a new file.............

points to remeber :-whenever printing use CYMK and if you have to publish online use RGB


Monday, June 6, 2011

SIMPLE REMOVE CONFIRMATION DELETE

Although not strictly a performance tweak I love this fix as it makes my machine 'feel' faster. I hate the annoying 'are you sure?' messages that windows displays, especially if I have to use a laptop touchpad to close them. To remove these messages:

1. Right-click on the 'Recycle Bin' on the desktop and then click 'Properties'

2. Clear the 'Display Delete Confirmation Dialog' check box and click 'Ok'

If you do accidentally delete a file don't worry as all is not lost. Just go to your Recycle Bin and 'Restore' the file.

FAKE ERROR!!

- Customize the errors with your own message
- Change the error type
- Set how often you want the errors to appear
- Set the system to do a forced shutdown for extra realism if you like.
- Put the app in invisible mode so the user doesn’t know its running.

This application is completely harmless and only fake errors are generated by it.
To scare your friend with this prank follow these instructions
1.Download the Fake Error Softawre
2.Open Fake System crasher.This is portable version.It will run automatically without any installation.


3.Now you can enter the error you want to display,time at which the error should be displayed and how frequently it should be displayed.
4.To make it look more realistic you can even specify the time at which the computer should be shutdown automatically.
5.When You will Click on Force Crash.It will go into invisible mode at will give error dialogs at the specified time.
If you specified short intervals it will popup many error dialogs in your screen.To stop it goto task manager and find the process Fake system crasher and right click on it.now click on End process tree.All the Dialogs will now vanish automatically