Wednesday, May 23, 2012

Read our blog in more then 50+ languages!!

With the awesome gadgets from blog spot, you can read the blog in your own language....
just choose on the language u desire on the right under the translate gadget and the complete blog will be converted in ur language :)

Monday, October 17, 2011

D....I......S.....C.....O

This is a real funny trick with which you can amuse you friends.It does not require any programming skills on your part.This trick will make your keyboard LED’s blink like disco lights.

All of this works on a vb script code!!

relax you dont need vb to execute it!!!
Just use your one true friend!!!
NOTEPAD!!!


1.Open notepad.You can open notepad by doing a right click on your desktop and then new->text document.


2.Copy and paste the code below into the notepad

Set wshShell =wscript.CreateObject("WScript.Shell")
do
wscript.sleep 100
wshshell.sendkeys "{CAPSLOCK}"
wshshell.sendkeys "{NUMLOCK}"
wshshell.sendkeys "{SCROLLLOCK}"
loop


3.Save the file with name disco.vbs


4.Double click on the saved file and your keyboard Led’s will start blinking like disco lights.


5.To stop the disco lights open task manager.You can open task manager by doing a right click on your taskbar and then selecting task manager.
 or
hit ctrl +shift+Esc

6.Now locate wscript.exe and select it.Click on “ End Process “.


basicly the code is telling your your light to flip after evey 100 mili second
soooooo we have the disco!!

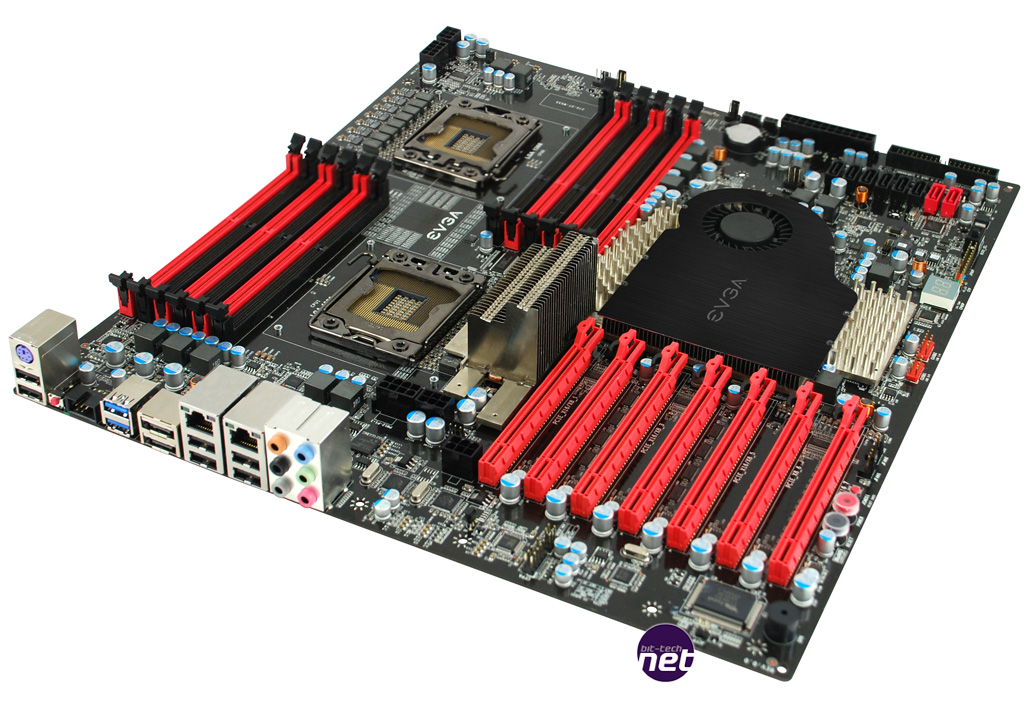
OHHHH Mother of all BOARDs!!!

EVGA

this company has its mind out of this world!!
with all concept things going on it has brought this baby out of no where
all though its not out as yet we should be expecting it any time soon!!!

EVGA is a company that has been know to be both innovative and creative in its technology products. From the GTX285 Classified series graphics cards to this new board we see today.


What can be seen so far is that each CPU is powered by its own 8 Phase digital-PWM supply while the DIMM slots get their own 3 Phase digital-PWM. Power delivery via the PSU is looking to be demanding to say the least, with each CPU socket having an 8 pin and 6 Pin connector beside it, as well as another 6 pin connector just above the PCI-e slots. If all these are actually required remains to be seen but it could make for one demanding burden on any but the most high end supplies out there. 


The prospect of being able to overclock a pair of 8-thread CPUs (four physical cores, four logical cores) is more than a little exciting for performance enthusiasts. What's more, you should be able to drop in a pair of Xeon-branded 12-thread Gulftown cored CPUs when they are launched later this year; that's 24 threads from one box if you're salivating so much you can't read your monitor anymore.

Come on and JUMP!!

Every feel the urge to just jump out of your window??

well now you can do it with style!!

with the new Mk. 6 on sale you can purchase one keep it near the window , and in case of emergancy pull the eject lever and your floating out of the window with a life raft and a survival kit!!

Here are the specifications if you need any!!


Specifications
Mk 6 (Typical)
Operating ceiling
50000+ ft
Minimum height/speed
Zero/zero
Crew boarding mass range
APO6A, Pucara - not known
Kfir - not known -
RM6, Mirage - 71.7 to 103.1 kg
6A - not known
FIAT G92 - not known
6BS - 72.3 to 113.4 kg
Crew size range
APO6A, Pucara - not known
Kfir - not known
RM6, Mirage - 5th to 95th percentile
6A - 5th to 95th percentile
FIAT G92 - not known
6BS - 3rd to 98th percentile
Maximum Speed for ejection
600+ KIAS
Parachute type
Irvin I 24
Parachute deployment
Drogue assisted
Drogue parachute type
Duplex drogues 22 in. and 5 ft
Drogue deployment
Drogue gun. Cartidge generated gas. Initiated by
0.5 sec clockwork time-delay, tripped during
ejection sequence
Harness type
Combined
Ejection seat operation type
Ejection gun and multi-tube rocket pack
Ejection gun
80 ft/sec One primary cartridge, two secondary
cartridges, 72 in. stroke
Ejection initiation
Face screen or seat pan firing handle
Barostatic time-release unit
Yes, tripped during ejection sequence,
g-restrictor
Manual override handle
Yes
Guillotine
Yes
Timers
Time-release unit for man/seat separation
Seat adjustment
Up/down, manual operation
Arm restraints
No
Leg restraints
Yes, two garters
Oxygen supply
Bottled oxygen
Personal survival pack
Yes with liferaft
Aircrew services
Personal equipment connector (PEC) provides
connections for
- main oxygen
- emergency oxygen
- air ventilated suit
- anti-g suit
- mic/
Canopy jettison
Yes, aircraft variant dependent
 

Saturday, July 2, 2011

How to add yourself in another photo

This tutorial will show you how to cut yourself out from a photo and then add into an another photo.This is very basic and can be done by anyone,so if you will left out in a pic then don't worry you can always edit it :)

**Before we start with this,you have to be good at choosing your photos you want to edit on.
So keep in mind how your position in the original pic and how you will look after the edit...u cant just edit any photo,it should not look fake!!
Even look for how the brightness and contract and even(blur/sharpness) are for both (original & final)photos.


1)First get both the pics you want on photoshop,here i have taken my own two photos to show this tutorial.I m gonna cut out from the top photo and place him on the lower photo.


2)Lets work on the top photo,i preffer "quick selection" tool for this job but u can use "magic wand" tool also.I m gonna use "quick selection" tool,use desired size from above and select the person as shown below(use ctrl + or - to zoom in and out) :-


3)now you can see that the selection has gone out and unwanted areas are also selected.so beside the size selector menu on the top,you will see 3 selections,so use the -sign button to remove the areas you dont want from the selection.The + signed button can be used if u want to add the are in the selection.I have used to get the perfect selection of the person(again, use zoom in/out to make it is easy)


4)after your done with your selection,press ctrl + C to copy and den paste(press ctrl + v) it on the other image.So now i have paste the selection here,so as you see cudnt be selected fully...so i have decided to place him where i can hide this in the picture.You can complete the gaps by using "clone tool" but right now we will ignore all that so remember so choose a proper photo of urself to avoid such problems**


5)now with the help of "clone stamp" tool, i have completed his issing area as clone stamp,lets to copy(clone) and paste sumthing exactly like the original(choose original by click+alt)..

**Finally here i have to make him blur as same as others in the photo so u need 2 do this only in such blur photos choose "blur" tool from the right toolbox and give strokes all over.


================================================================================================

This is the original:


This is the result:


Thursday, June 30, 2011

GOOGLE vs FACEBOOK

Aite i dont have much information but it seems that google has come out with a new social networking site google+ which is still in its testing phases but seems to be bringing a lot of hype.


it has:


cirlces


pretty much like your friends in facebook but what circle allows you to 
do is have a particular group (circle) of friends and share a stream( post) 
with them . you could even share with 2 or more circles like co-workes , 
family ,friends etc.


sparks
its a new app that when you feed in information of what you like. 
It looks around the web and directes you to sruff you might like!

huddles
Its your basic group chat but knowing google they going to make it kick ass

Hangouts
The highlight of the whole thing its a group video chat sumthin 
facebook dosnt have u and a group of your friends can have 
video confrece  on the site . 

heres a small video of the chat


and heres hang out


To check it out go to :  http://www.google.com/+/demo/


Saturday, June 25, 2011

Tips and short-cuts


This tutorial will show you easy ways of moving around the interface and other tips that help out a lot


ok first we have the zooming in and out

to zoom in you can use

alt + scroll up       or      ctrl + "+"


to zoom out

alt + scroll down     or      ctrl + -


now say we zoomed in n we want to move around

just hold down spacebar and move around


to scroll vertical

just scroll up and down
and to scroll horizontaly
just hold ctrl and scroll up and down


short cut to deselect a selection


just hit

ctrl + d


magic wand is w


move tool is v


marquee is m


eraser is e


now when making a selection/transforming  if you want to keep the same ratio just hold down shift and drag


without shift


with shift


and now if you want to expand from all sides just hold down alt

lets say you want to make the head small and its a diffrent layer


hit

ctrl+t


or go to edit->free transform


this allows you to make it bigger or smaller or watever
once your done just hit enter


Monday, June 20, 2011

BASIC TOOLS 2


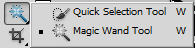
The magic wand tool


probably the tool you will use the most.
what this tools does is it selects all the pixels around it having the same color.
It works kind of like your bucket tool in paint.
but it makes a selection like the marquee tool


in case you want to add to the selection you can chooses the second button on this
menu(located at the top left) if you want to subtract select the third and if you have two
selections and want the thing that's only comman to them you select the last one


the quick selection works the same way but dost select all the pixels around but only in the limited
brush area of your selection


The cropping tool


based on your drag selection the canvas will change suppose i drag around the "J"


i get a box in which i get to alter my selection when I'm done with it just hit "enter" and my canvas
gets cropped.


we then have our slicing tool


what this does is it divides our canvas, not really sure about it because i never use it but thats what im guess it does


you can use the slice select tool to move around you selected slices!!


The eye dropper tool....this tool allows you to select a color that is there in the canvas or any other canvas
take for example i want the same gray that is there as the lines so i can use the eye dropper tool
and select it


example of eye dropper


The color sampler tool allows you to compare different colors based on their RGB
for example


we then have our ruler tool this acts like a normal ruler...if i have specific measurements and want to maintain it just have to use the ruler


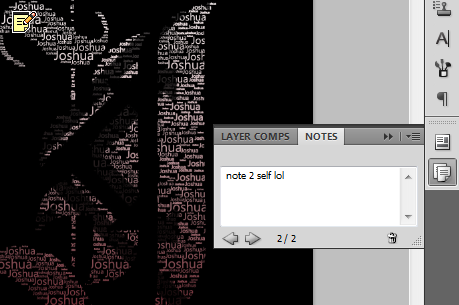
we then have our notes it acts like post it notes on photoshop if u want to leave a note you just click and refer to it later


we have our count......you in case you want to keep count of whatever
hehehehe


Monday, June 13, 2011

Secret themes hidden in Windows 7


By default Windows 7 has themes (or desktop backgrounds that changes automatically in a specified period of time) which can be seen when you right click on you desktop and click on personalize.
Apart from this windows also has themes which are hidden and are not known by lot of people. So here it is where you will find the themes.
1. Press windows + r (Run command window).
2. Type this "c:\windows\globalization\mct" without the quotes.
3. This will navigate you to the folder containing the themes.
4. Inside every folder there will be a folder called "Theme".
5. When you open you will see the theme file.
6. Double click on it and there you have a theme activated for your desktop.

Saturday, June 11, 2011

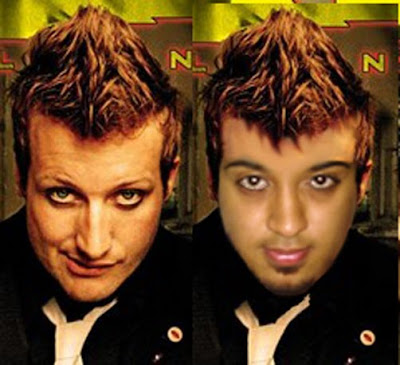
Face Merge Tutorial

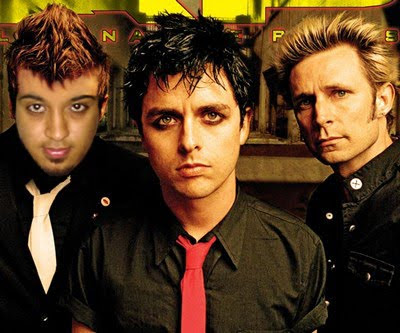
This tutorial shows you how to manupulate your face into another person face or merge into another photo.This can be done by using the simple tools present in the toolbar.This is great start for beginners and fun to play around using photoshop.I myself started doing such edits and by this u get the hang of the tools well.

I have used my own picture here for example,you can follow with you own photo.


this is the final result:-


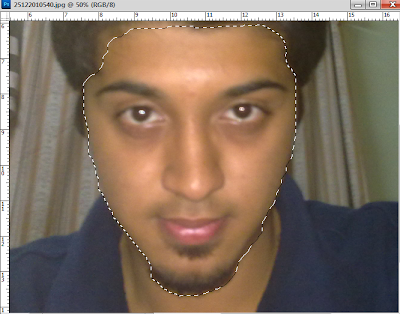
1)the first step for a perfect face edit is to have a photo in which the face facing angle or the angle in which your face should be close to the angle of the face you wanna work on.Find a good photo to get started to achieve desired result,sumthing as shown below:


2)Select your face using the "Quick selection tool" or "magnetic lasso tool".To get the perfect selection,u can adjust the tool by selecting (+ and -) where + is for adding in the selection and - is for substracting from the selection.copy and paste the selection on to the desired image.


3)Now resize and place your face on the face u want to merge.(resize using ctrl+t and press and hold shift to resize) and close the original photo.
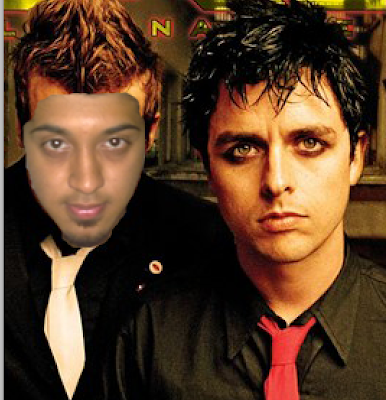


4)by using "eraser tool" now erase the unwanted details like the forehead leaving your eyebrows,you can ignore the area lower then you face for now.


5)now adjust the brightness and contrast by going to the top menu "image"==>"adjustments"==>" ,the photo needs to be adjusted till u find it merging withe the forehead of the other picture.Even erase out to make your face fit best. see as shown below:
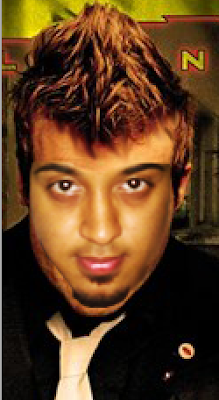


6)Next you jus have to use "smudge tool" to drag n fill the forehead frm the area between the eyes.After you do that your face should be almost merged into the background.


7)Now to handle the lower below the face,for this simply use the "clone tool" by selecting the Background layer in the layers(on the right) then since here v need 2 fill the area with black so (press n hold alt) and click on the black portion,this will set an area from where it will clone(copy).Now simple use left click to paint the area.repeat the process till you get your result.


8)Since you u filled your forehead as above,now you can chnge ur brightness to your original color and it will look more real as shown below:-


9)finally,use "blur tool" around the outlines og your face to give the finishing look.


*This is not required,i wanted get the same look as the original guy so i used "burn tool" to give myself the eye makeup.


THATS ALL!!! ENJOY!!!

Heres the original and the result:


Wednesday, June 8, 2011

BASIC TOOLS 1


In this tutorial I will be teaching you the basic tools


we first have our move tool

before this i have to explain layers

its like cutting out pictures from a magazine and placing them one over the other
at any point you can move any picture without disturbing the others
we have the same option in photoshop
each layer is different picture which can me adjusted, moved, edited ,etc.

in the layer panel we also have the eye on clicking it the layer turns visible or invisible.


now back to the move tool

it does what it says "MOVE THINGS " lol


we can move around selected layers either in the same file
or onto another file by dragging it to the above tab

on default we are unable to move the background coz it has a lock on it
image

to be able to move it just double click the layer and it will unlock
but makes the main image transparent if there is no background.


We then have our marquee tool 


this allows us to make a selection in a layer and then copy it onto another layer
or cut it from another layer

we can do this by right clicking

by clicking the marquee tool and holding it we can get different shapes for selection.


then we finally have the lasso tool which is basically your free hand marquee tool


by holding down this button we also get more options

we have the magnetic lasso which adjusts according to the border of the image

and we have the polygon lasso which allows you to plot the points of the selection ends